
How to fix a Southern Cross Windmill
(Also known as “how to fix your southern cross windmill” or how to fix a southern cross wind mill or “how a southern cross windmill works”.)

My Windmill broke after many years of good service; and lacking the tools and knowledge to fix it myself (nothing easy to find on Google prior to this post) I procured a pair of professional windmill repairers to do it, asked them some questions and observed the process. So, here’s some second-hand tips on how to fix your own Southern Cross Windmill.
(work in progress October 2009 – pictures coming soon)
Before we start:
Wind mills can be a bit dangerous and fiddly. They’re often damn tall, and may have 30 metres of (heavy) metal pipe hidden from view under the ground; so you’ll need to be careful working on one. If you’re not confident with heights, heavy tools, etc then this probably isn’t the job for you – proceed at your own risk! Things that could go wrong include:
– getting half way up the windmill ladder and suddenly discovering you don’t go well with heights. (Take your phone with you just in case.)
– getting all the way up, then getting knocked off by a suddenly spinning windmill.
– Undoing something at the wrong time and losing bits for ever down the hole.
– Grabbing at something that is rapidly falling into a hole, taking part of you with it!
– Winching up a pipe, hitting the top of the windmill by mistake and breaking something. (Hopefully not winching your ute up the windmill!)
How they normally work.
Well the top bit is kind of obvious. The fan-shaped bit spins around, and some metal rod moves up and down with it. (If these two things don’t happen together you might have a gearbox problem. I didn’t so unfortunately I can’t give you any tips here. There is oil in it ‘tho so it could be worth checking if you’re up there.)
A metal rod then travels down the centre of the pipe that you can see, all the way to the bottom where it joins into the ‘pump’.

The pump is actually quite simple. It’s just a 2 foot long hollow metal cylinder with a plunger in the middle – a bit like you’d find if you took apart an old bike pump. And, just like how cars have cylinders and rings; this plunger-thing has a couple of rings made of either Neoprene or Leather to form a seal. (Those in the know seem to refer to these as ‘buckets’.)
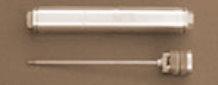
Of course, this design would not quite work without some sort of valve – because you want to lift water ‘up’ the pump but not push it back out again on the down stroke. There are two parts that work together to solve this problem.
At the end of the pump is a non-return valve. It lets water into the pump from the bottom, but (ideally) not back out. So, this means on the upstroke the plunger bit can suck up some more water.
Now, on the downstroke the water can’t get out, so in the centre of the plunger there’s another valve that lets water flow past it on the downward stroke, ready for the next big suck & lift.
In some cases, they may have added a second non return valve to a section of pipe below the pump – presumably as an insurance against one getting stuck open with a bit of grit, and / or to allow any crud sucked up on the up-stroke to have a chance to settle back to the valve and out at a later stage.

So basically you have a reverse bicycle pump, lifting water out rather than pushing air in. The column of water is eventually ejected from the pipe – usually via a T piece, and drained into a tank.

What can go wrong
A few common things that go wrong:
1 – Rust in the pipe causing a leak underground.
Assuming your pipe is metal, it is possible that over time the pipe might rust. If the pipe rusts, then it may develop a leak. You’ll probably hear this as the sound of water being pumped and then immediately drained back down the hole. This would lead to a reduced output, with you only getting water on particularly windy days; if at all.
The rust point is generally near the depth of the water line, and may also be encouraged if the bore casing is metal as well due to electrolysis. (You can now get Poly pipes instead to reduce this risk.)

2 – Buggered Buckets?
Like the piston rings in your car, if the buckets are no longer snug, they’ll have a reduced lifting ability.
3 – Non-return valve stuck.
If your non return valve (or foot valve?) has become stuck open it will let the water back out. I guess you’d have to be unlucky but it can happen.
4 – Siezed pump
If the bore runs dry, it’s possible that the buckets will get hot and sieze. (Apparently more common with neoprene ones.) This then puts significant force on the central rod which might bend it to buggery.
5 – Others.
Other possibilities could include the rod joins rubbing a hole in the pipe, gearbox breakdown, pipe getting a swing up underground, etc.
How to take one apart?
You’re gonna need some fairly heavy duty stuff for this job. Since I’m an IT guy I don’t know all the jargon. You’ll need at least
– a winch or (block and tackle)
– possibly some sort of pulley if you’re winching from ground level.
– a stilson, looks like a wrench, might actually be a wrench
– a pipe grabbing thing. (looks like a motorbike chain on a stick) (Maybe a second stilson / wrench would do – you want to grab two bits of pipe and twist y’see.)
– Some sort of grabby thing so you can attach your winch / lifting thing to your pipe. (They had some special tool for this.) [edit: Advised this might be called a pipe clevis or pipe dog – I can’t find an exact match on the ‘net but you might get some ideas from http://www.deanbennett.com/pipe-tools.htm ]
– A second grabby thing that can hold the weight of the remaining pipe while you unscrew the section above it.
– One or two vice grips. (Google ’em.)
– Other stuff.
The most important thing here is to have some way to lift the rather heavy pipe out of the ground. You might use a winch and a pulley for this purpose.
You’ll also probably need to remove one or two of the side supports so you can get enough room to get the bits of pipe out and have easy access to the bore area.

1 – Secure the fan so it can’t spin. (I guess a rope will do.)
2 – Unbolt the gearbox from the rod.

3 – Unscrew the T-Piece going to your tank. (It’s probably just resting in the tank’s opening so there’s nothing to stop you just unscrewing it and pushing it away.
4 – Unscrew the top section of pipe from the bottom section of pipe. Lift this a couple of feet and you should find the first join on the inner rod. This also unscrews. You do not need to worry about the inner rod falling into the hole unless there’s a major problem down below already (such as a pipe having completely rusted through.)

5 – Unscrew this inner rod using two pipe grabby tools and then remove the upper portion from inside the now suspended bit of pipe.

6 – Now, lower and remove the bit of pipe.
7 – Devise a way to lift the remaining length of pipe.
In my case, they positioned a pulley at the top of the windmill which they threaded a winch through, with a grabby thing on the end.
My suggestion would be to try to have some sort of backup grabby thing down below too just in case the one up top let go.
Proceed to lift the pipe until you get to the next join. Note that the length of pipe might be taller than your windmill, which is a pain as it will mean you’ll need to clamp the pipe and lower your grabby thing. You’ll also need to be careful that the top of the pipe doesn’t hit the top of the windmill; and that if your grabby thing has a remote release rope you’ll want to make sure it doesn’t get caught on something and release when you really don’t want it to.
When you finally get to the next join, you repeat the process by somehow twisting the two pipe segments apart. You might have to do a bit of swearing at them. Applying heat might help them loosen, or just allow you to burn yourself.
Once they are separate, lift the top section a little further so you can now hopefully see the next inner rod join. Unscrew this and like before, remove the rod from the bottom of the suspended pipe. (This might be fiddly so you might need to lift the suspended pipe fairly high to get enough room.
Repeat the process until you finally get to the pump.
You can disassemble the pump by unscrewing the bottom end and then pushing the rod out of it.
If you elect to hone the pump (that is to resurface it) you may need to use new leather buckets as these will expand to fit the new surface. Neoprene ones may not.
Putting it back together?
Umm, I didn’t take it apart. You did 😉
I’ll cover that later. Suffice to say you might need some of that magic plumbers tape that they put on thread. (Probably known as thread tape?) You’ll also need all your fancy lifting gear but in reverse this time. Actually you might be able to cheat with some ropes and a horse knot, but not sure. (A horse knot is where you just wrap a rope around something three times and friction takes care of the rest!)
A possibly useful and interesting site is at http://www.windmill-parts.com/index.html